Jumat, 30 Januari 2015

Install Oracle Java Runtime (JRE) 7 in Ubuntu 12.04 (Precise Pangolin)


Objectives:
  • Install Oracle Java / JRE in Ubuntu 12.04 (Precise Pangolin)
  • Enjoy!
To get started, press Ctrl – Alt – T on your keyboard to open Terminal. When it opens, run the commands below to remove all other installations of OpenJDK from your system.
sudo apt-get purge openjdk*

oracle_java_precise

After that, go and download Java JRE package from here.  When prompted, save the download. Please select the 32 or 64 bit .tar.gz version file from the list.
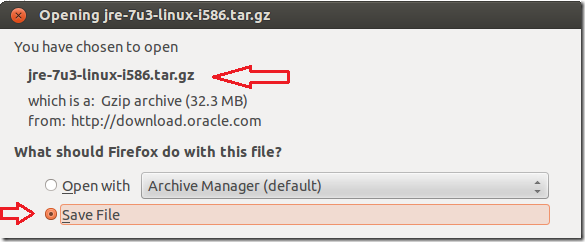
oracle_jre_precise

After saving the file, go back to your terminal and run the below commands to extract the java packages you downloaded.
tar -xvf ~/Downloads/jre-7u3-linux-i586.tar.gz

oracle_jre_precise_1

Next, create your java 7 folder by running the commands below.
sudo mkdir -p /usr/lib/jvm/jre1.7.0

oracle_jre_precise_2

Then move all the extracted files and folders into the java 7 folder.
sudo mv jre1.7.0_03/* /usr/lib/jvm/jre1.7.0/

oracle_jre_precise_3

Next, run the commands below to install / update java 7
sudo update-alternatives --install /usr/bin/java java /usr/lib/jvm/jre1.7.0/bin/java 0

oracle_jre_precise_4

Next, create a plugin folder in your home directory by running the commands below.
mkdir ~/.mozilla/plugins 

oracle_jre_precise_5

Finally, link the java plugin to your profile.
ln -s /usr/lib/jvm/jre1.7.0/lib/i386/libnpjp2.so ~/.mozilla/plugins/

oracle_jre_precise_6

That’s it! Enjoy!

oracle_jre_precise_7

If your system profile is AMD64, then link java to your profile by running the commands below.
ln -s /usr/lib/jvm/jre1.7.0/lib/amd64/libnpjp2.so ~/.mozilla/plugins/

How to add extra local storage in Proxmox VE

Purpose:


Adding more local hard drives to Proxmox for storage purposes.


Used Software:

Proxmox VE 3.1

Necessary:

Extra added hard drives without partitions.

Installation:

SDA is the drive where the proxmox installation is running
SDB is the new drive that will be added to the proxmox.


Open the Proxmox Shell


With fdisk you can find your drives that you want to add, if you are not sure what the device name is for your hard drive that you want to add. 

    Type: fdisk -l


Find the "Disk" with no valid partition table. That will be probably your hard drive you want to add.


"Disk /dev/sdb doesn't contain a valid partition table"

To make a partion on the new drive type the following:

 Type: cfdisk /dev/sdb

Choose the following options:

New  -->  Primary  -->  Specify size in MB
Write
Quit


Now a physical volume has to be created.

Type: pvcreate /dev/sdb1

Create a volume group. The name "Data-Storage" is an example. You can name it anyway you want. Consider a logical name, because this is the name that will be used in the proxmox web interface:

Type: vgcreate Data-Storage /dev/sdb1

Add the storage in ProxMox


-       In the webinterface click on the directory Datacenter and then click on tab Storage.


-       Click Add – LVM Group


o    Type an ID Name for example data-storage


o    Base Storage: Existing Volume Groups


o    Volume Group: Data-Storage


o    Enabled: Checked
o    Other options should be adjusted accordenly to what you want with it. 

Now the extra storage has been added in Proxmox and ready for use.